How to Breeze Through Drone Software Set Up
You’ve assembled your autonomous drone, now what? In order for your drone to activate autonomous functions, many new systems need to be configured and calibrated. Software set up is one of the most important yet tedious parts of developing your autonomous drone because there are several components that need to be calibrated. For first time builders, it might take time to familiarize yourself with the many third party platforms you can use to program your drone.
Here at ModalAI®, we’ve calibrated the software for our fair share of autonomous drones and understand how daunting it might be. If you are working with an off-the shelf development drone solution such as our Starling 2 Max, the software set up has been taken care of - it’s ready to fly out of the box. If however, you are building your own drone and are using our VOXL® platform to help power your vehicle, we’ve developed a checklist to help you set up the software:

Step 0: Validate Hardware
Before you start calibration, validate your hardware. This step is a great way to potentially save time during the software set up process. Here, you will double check that your hardware is set up correctly:
- Make sure you have a multi-meter to perform continuity tests
- Check for expected voltage levels
- Validate that the current consumption of the vehicle is expected
- Validate all hardware connections
- Perform a power on test, limit currents on DC supplies first
Step 1: Set Up Development Environment
Your development environment is where you program and operate your drone. Before drones had the brain power from companion computers to complete autonomous tasks, they would only need to be operated with a ground control station (GCS). When set up on your PC, laptop or Android tablet, the GCS is where you can control the drone. Now that drones can accomplish much more than they could without on-board processing, a GCS and a software development workflow are required to operate drones. Both of these systems allow you to manually control the drone and program autonomy respectively.
There are several GCS options that you can use. Here at ModalAI, we use QGroundControl and have published guides to help you set it up. We also create our own stack of software development workflows that you can use on VOXL. Here’s how to set up your development environment:

- Download a ground control station - QGroundControl
- Set up a software development workflow stack - ModalAI Software Stack
- Connect VOXL companion computer to WiFi. View tutorial here. Video Tutorial
Step 2: Configure Flight Controller
Your flight controller enables your drone with the ability to fly. You need to activate your flight controller and connect it to your companion computer and network. Here’s how we configure our PX4 Flight Core:
- Set up the parameters of your aircraft with your ground control station. View our tutorial on how to upload your parameters to QGroundControl
- Connect flight controller to companion computer. (Skip this step if you are using the VOXL Flight®)
- Tune vehicle parameters
- Calibrate sensors (IMUs, magnetometer, temperature, etc) Tutorial
- Configure RC radio for manual flight testing Tutorial
- Calibrate ESCs (not needed if using D-shot or UART) Tutorial
- Battery Configuration Tutorial
- Set up system ID if using multiple drones on a single network Tutorial
Step 3: Validate Hardware Again
Once your flight controller is set up and connected to your companion computer, conduct another hardware test. Check that the newly added flight components function properly:
- Check for proper motor spin direction
- Check for proper RC connection with transmitter
- Validate image sensors Tutorial
- Check for GPS functionality (if applicable)
Step 4: Calibrate Companion Computer
Time to activate the brains of your operation. Your companion computer is what enables your drone with autonomy. This is how we set up our companion computer with VOXL:
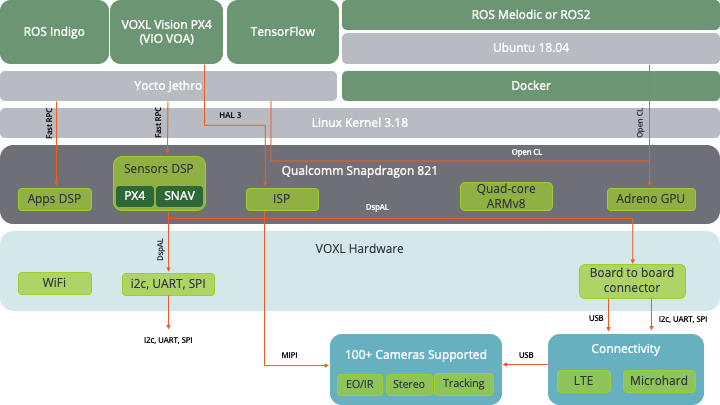
- Connect VOXL 2 companion computer (Linux) and PX4 to ground control station using VOXL Vision PX4 Tutorial
- Set up communication from companion computer to GCS. Three options:
- Set up image sensors and processing (Skip if you have VOXL)
Step 5: Enable Optional Features
There are many other features you can add that will enable your drone with new functionality. If you plan to use these features, here’s how to set them up:
- Set up ROS. Tutorial
- Additional Edge features. View our pre-built containers/source code to run examples including:
- Peripheral hardware (Lidar, LCD displays, chemical sensors, etc.)
Step 6: Finalizing Vehicle Behavior
In this step you will configure the drone’s start up behavior. Program what features and software should be activated when the drone is turned on:
- Determine which Linux services will run and in what order
- Configure modem (microhard/cellular/LTE) connections
- Set up video streaming
- Configure Docker containers to run
You’re Ready for the Flight Test!
Once you set up the software on your autonomous drone, you’re ready to conduct a flight test and watch your drone take flight! If you’re itching to fly and don’t want to deal with software set up, our fully-built, ready-to-fly Starling 2 Max development drone will save you time and get you out on the test field right away. Our next blog will teach you how to flight test your autonomous drone.
Need Help? We Got You Covered.
If you run into any problems during your software set up, the ModalAI® team is here for you. Visit our ModalAI Forum to connect with our engineers for help related to our products, software, or systems development.


